
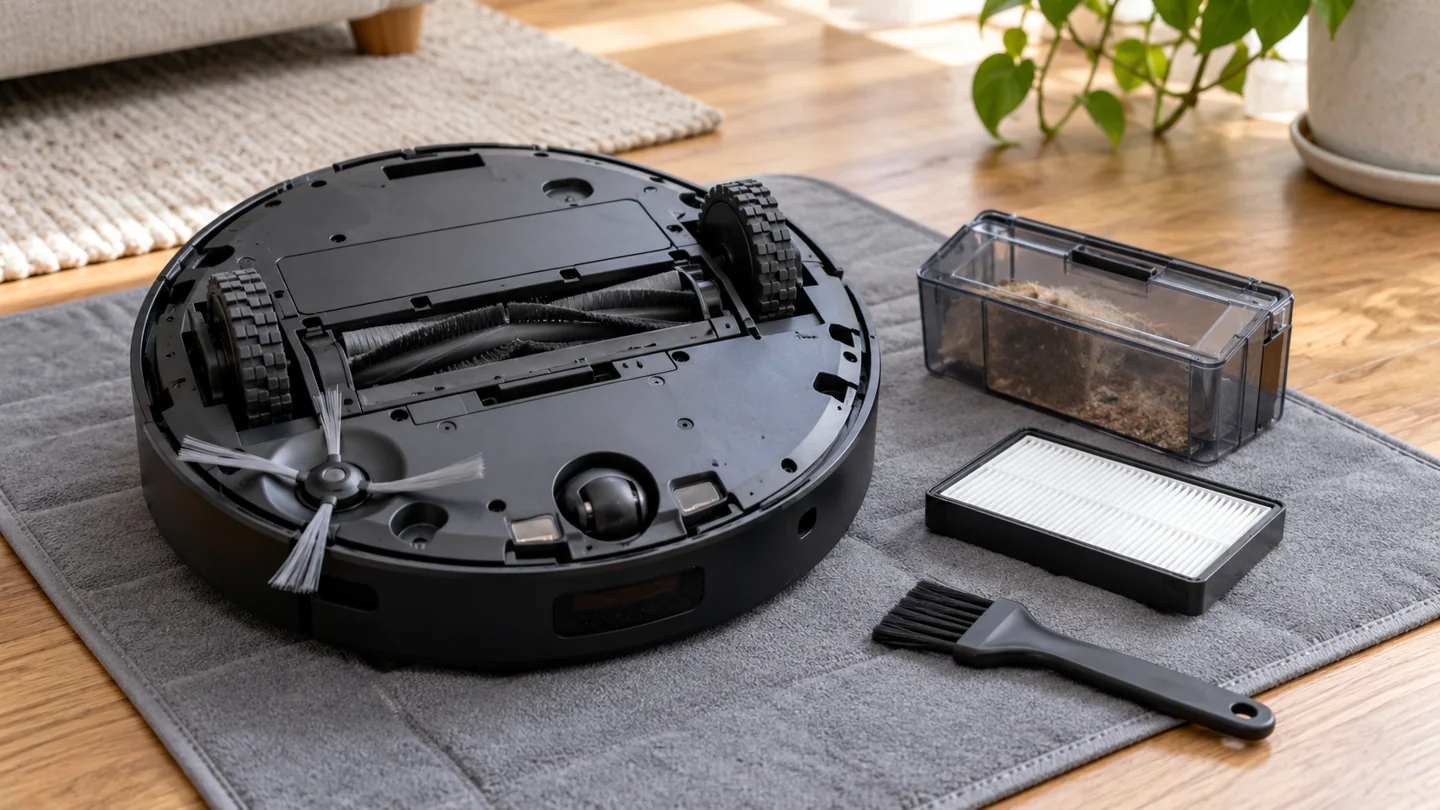
Maintain a robotic vacuum by checking its bin, intake, brushes, wheels, sensors, filters, charging contacts, and dock using the exact model’s care instructions. Empty collected debris before the stated limit, remove accessible tangles, and replace worn compatible parts when required. Wash only components identified as washable and keep electronic assemblies dry.

A self-emptying or mop-washing dock reduces certain chores but adds components that need care. It does not make the robot maintenance-free. This guide organizes the routine by component so you can prevent repeated rescue trips, poor pickup, docking failures, and avoidable floor marks without guessing which parts can go under a tap.
Build a model-specific care checklist
Find the robot and dock model numbers and download their matching manuals. Identify any differences between the care schedule for the robot, the dust-emptying station, and the water-handling system. Note the replacement part numbers rather than ordering by brand name alone.
| Component | What to inspect | Care limit |
|---|---|---|
| Bin and intake | Fill level, lodged debris, lid, seals, and transfer opening | Remove the filter before any permitted bin washing |
| Main roller and side brushes | Hair, thread, bent arms, worn cleaning surfaces, and end caps | Remove only the parts the manual makes user-serviceable |
| Wheels and caster | Wrapped hair, embedded grit, movement, and damage | Do not force a nonremovable wheel assembly |
| Sensors | Dust, smears, obstructions, and scratched windows | Do not cover, abrade, or modify safety sensors |
| Filters | Loading, damage, correct fit, and replacement interval | Wash only an explicitly washable element |
| Dock | Approach space, contacts, bags, accessible paths, and tanks | Disconnect power before permitted maintenance |
Make a quick check before each run
Look over the floor for cables, socks, loose packaging, small toys, pet accidents, and wet patches. A robot with advanced obstacle recognition still needs a suitable route. Check rug fringe, movable mats, and low furniture that caused trouble previously.
Confirm that the bin is not overfilled and the robot is correctly assembled. If it returned after an error, resolve the error before starting a new schedule. A repeated “clean” command does not remove a physical obstruction.
A short route check is especially valuable after rearranging furniture, bringing in outdoor grit, or hosting visitors. New objects can change the cleaning route even when the stored map remains the same.
Empty and inspect the robot’s bin
Empty the bin at its marked limit or according to the manual’s schedule, whichever relevant instruction applies. Lower the bin near the receiving waste bag to limit dust release. Inspect its accessible inlet, flap, seals, and latch.
For an auto-empty model, occasionally confirm the transfer actually occurred. A full dock bag, blocked transfer route, misaligned robot, or unsuitable debris can leave material in the onboard bin. Do not assume the sound of the dock proves complete emptying.
Wash a bin only if the manual permits it and only after removing nonwashable parts. Some bins include electronics or integrated features that change their care requirements. Dry all permitted washed components fully before reassembly.
Remove hair from brushes and roller ends
Switch the robot off using its maintenance procedure before turning it over. Place it securely on a suitable surface, then open only the intended roller cover. Remove hair and thread carefully with the supplied tool or documented method.
Check roller ends and permitted end caps. Material wrapped at the ends can be less visible than a tangle across the center. Keep cutting tools away from seals, bristles, wiring, and your fingers.
Inspect side brushes for bent or broken arms and confirm their attachment is secure. Replace worn parts with compatible items. Do not reshape plastic with boiling water or heat unless the manufacturer specifically prescribes that method.
Keep wheels and the underside free of grit
Inspect drive-wheel treads and the caster for hard fragments. A robot can drag trapped grit across a floor even when its roller material is soft. Remove ordinary debris according to the manual and check that wheels move as intended.
Some casters are designed to detach for cleaning. Others have different procedures, so do not pull one out simply because another model’s guide shows it. Refit permitted removable parts completely before running the robot.
iRobot’s Roomba 700-series care guidance specifically addresses caster debris and floor-damage risk. Use that as a reason to inspect contact points, while following the removal procedure for your own machine.
Clean sensors without bypassing them
Use the specified soft cloth and method on accessible sensor windows. Different robots can have cliff sensors, wall sensors, cameras, laser assemblies, bin sensors, and dock-detection areas. Do not assume all require the same treatment.
Do not spray liquid into openings, polish a lens with an abrasive, or place tape over a cliff sensor. A dark rug that triggers avoidance is not a reason to disable drop protection. Use an appropriate boundary or alternative cleaning method.
If navigation changes after cleaning, check for a missed smear, displaced cover, or incorrectly refitted part. Persistent sensor errors need manufacturer support rather than increasingly forceful wiping.
Care for filters by their individual instructions
A robot’s filter may be nonwashable even when its bin can be rinsed. For example, Roomba 600-series care instructions identify filters that are not designed for washing. Other families can use different components.
Follow the permitted cleaning and replacement schedule and inspect for tears or a damaged frame. Do not run without a required filter to increase suction. Do not use compressed air, detergent, disinfectant, or fragrance on filter media unless explicitly allowed.
For a washable element, use the required drying process and wait until it is completely dry. Keep a compatible spare if the manufacturer permits rotating filters. Our filter replacement guide explains why one universal interval does not work.
Maintain the dock and charging area
Keep the dock in the placement and clearance range specified by the manual. Clear its approach and prevent cables or loose mats from interfering with alignment. Avoid repeatedly moving it during an established cleaning routine.
Disconnect the dock before permitted cleaning and use the exact contact-care method. Manufacturers differ in what they allow on charging contacts, so do not generalize one brand’s abrasive or damp-cleaning instruction.
For a dust-emptying station, inspect the bag or container and accessible transfer path. For a water-handling dock, empty and clean designated tanks, trays, pads, and removable parts as instructed. Keep clean and dirty containers correctly identified and do not add unapproved cleaning mixtures.
Battery care is not repeated full discharge
Use the approved charger and follow the manufacturer’s temperature, storage, and long-term inactivity instructions. A robot designed to remain on its dock should not automatically be disconnected after every charge because of a generic fear of overcharging.
Do not deliberately run the battery completely flat as a routine maintenance ritual. If runtime declines, compare similar routes and settings, then check charging alignment and maintenance before assuming the battery has failed.
Stop use for swelling, unusual heat, leakage, smoke, or charging damage. Do not open a battery pack or fit an unverified replacement. Our disposal guide explains why batteries need an appropriate collection route.
Software, maps, and schedules need occasional review
Use official update instructions for connected models. Do not connect a robot to a computer or install unofficial firmware as a general maintenance step. Check what a restart, Wi-Fi reset, or factory reset changes before choosing it.
Review room boundaries after a layout change and adjust schedules around pets and household use. A saved map does not eliminate the need to pick up new clutter. See how robot systems work for the difference between navigation, cleaning, and connectivity.
Choose inspection frequency from actual use
Use the manual’s schedule as the baseline. Inspect more often when the robot collects lots of hair or debris, and check promptly after an error or unusual sound. Separate inspection, cleaning, and replacement in your notes: they are different tasks.
A maintenance log can list the last filter care, roller inspection, bag change, and recurring error. If a robot repeatedly stops despite the prescribed routine, use stopping-problem troubleshooting rather than simply increasing maintenance frequency.
Dock access matters as much as a tidy appearance. Our guide to placing and concealing a robot-vacuum dock explains how to balance access, ventilation and the robot’s approach path.
ILIFE controls and tank arrangements vary by model. Use our ILIFE robot-vacuum setup guide alongside the exact manual before choosing a schedule or changing between vacuuming and mopping.
Charging indicators and timing are model-specific. Use our Roomba charging guide to distinguish a normal charging session from first-use or troubleshooting instructions.
Frequently asked questions
Does a self-emptying robot still need its bin checked?
Yes. Confirm that debris transfers and that the onboard intake, filter, and seals remain clear and correctly fitted. The dock itself also needs maintenance.
Can I wash the whole underside?
No. Keep electronic assemblies dry and clean only the parts the manual permits using the specified method. A damp-cloth instruction for one surface is not permission to rinse the whole robot.
Should I replace parts when an app timer reaches zero?
Follow the manufacturer’s instructions and inspect the component. Understand whether the timer estimates use or measures actual condition. Reset reminders only after completing the relevant task.
Keep the routine specific and repeatable
A clear route, clean contact points, an unobstructed intake, correctly maintained filters, and a serviced dock let the robot do its intended job. Use the exact manual for methods and intervals rather than treating every robot as the same appliance.

Abi Khan is the founder and a content writer at GlobVacs. His published work covers vacuum-cleaner buying guides, product comparisons and practical maintenance advice. Read his author profile and selected articles.